
Building out a COOL Little Blue Hotrod! - Project Dive
- Nathan Klarmann
- May 1, 2024
- 5 min read

Its rare to get the opportunity to put something like this together, so I decided I'd talk about some of my process in building out a hotrod! I was approached earlier this year with completing some fab work and finishing all of the wiring on a little hotrod project so here goes!


I got this project in with a Storage Bin Floorboard and alot of things to address! No dis, I love the creativity! It was decided that I would be building a floorpan and seatbox to house the fuse panel and switches. So I got to work getting things rolling for the floorpan! FYI, floor pans are big. Haha, I don't fabricate as often as I'd like now a days and it's been a while since I've done something this big! I wanted to mount the Steering Column first as it would stay seperate from the main floor pan. Grade 8 bolts are a must on safety items like this! The bracket was modified slightly for U-joint clearance and a better angle for the clamps but otherwise an off the shelf mount! Worked out nicely!


Onto the floorpan templating. Thank goodness I had a cardboard box from a hood laying around, I think I needed close to a 4ft by 4ft section to draw the floorpan out. Then so much trimming until it fit just right! I thought about using 10 gauge steel for the floor pan but am so glad I ended up going with 12 gauge! The floor was VERY sturdy, but was still a HUGE PITA to cut out! I ended up using a 7in cutting wheel from the welder near me and it still took me way more time than I anticipated to cut this thing out and clean it up! Only 1 adjustment after first install too! GG Template!


At this point in the project, since the cab did not currently have any mounting, I decided I would through bolt the floor and the cab to the frame of the chassis to make everything as solid as possible! Then off to design a seat box!


I wanted to account for the seat cushion as well in the seat box height so I built a starter frame to make sure everything felt right! I built the box out of 1/2in MDF and 2x4's, just goodies from Lowes! I didn't get anymore photos of the seat box until it was in paint with the floor pan and column mount! My close friend and badass painter John Deking helped me scratch and shoot all of the components with these mighty "Turbo" spray cans I found at Lowes. I will say this, if you are spraying a floorpan, these are kickass! Way more coverage and way less passes vs. small conventional cans. Too big for the column mount though.
Work your magic John!


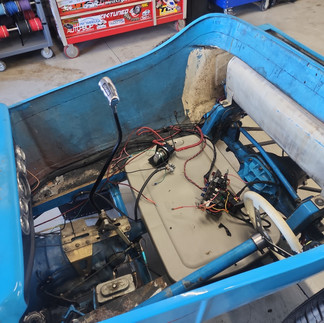
While I was literally waiting on paint to dry, I would continue forward to finalize all of the wiring and go for first powerup, all electrical functions test, and first startup. This was best to do while the cab was off and floorpan was out as I would run all of the wiring along the vehicle frame. Check that out! It's so naked! Also had to dress up those spark plug wires! Nothing like some zip-tie dividers to clean things up on the cheap!


There was already most of the front body harness in the vehicle when I got ahold of it, but I tested and fixed a few connections and made everything bueno there! Onto making sure everything was there for the gauges and wiring up the dashboard! I'm a little OCD when it comes to my wiring, I don't know if you can tell.

Got everything installed in the dash! I was excited to start seeing things come together! Also excited to see painted parts ready to go in!


I made sure everything was in the wiring harness for the rear body connections and would build a subharness later.
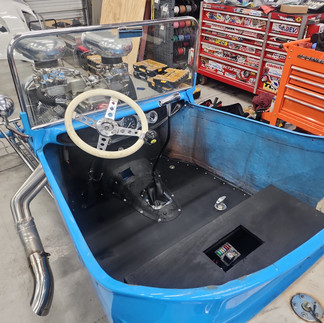
I installed a windshield onto the cab, a kit with provided mounts for this body, and got everything ready to stick it all together for the final fitment. Lastly as the cab went on final, I spec'd out a battery for the tray that was present and created a custom battery mount. I reworked the battery cables and fit everything in the provided space just barely! So stoked with the fitment! Also I decided to mount the kill switch to the frame so it would stay with the frame if the cab is ever removed again. Wiring is finally looking nice and clean!

It was D-Day! I sent it and assembled everything for the first time before I put all of the finishing touches on the project and got it running! Here she was! Looking pretty fresh so far!


I finished out the rear body harness for the car and fit everything to the vehicle around this time also (apparently right before the floorpan). I ended up using a dual-filament universal bulb housing from O'reilly's with an 1157 for the Park/Brake Lights which with a little modification worked out great for these custom body bulb housings! Here's the rear body harness I built, all installed - ready to work!

The finish line was approaching fast! I went for first start but ended up getting shut down by the distributor having an internal short. Here is a photo of that during some of my testing. How lame.
The unit kept blowing fuses, regardless of the primary ignition coil being connected. After a test with my multi-meter, I determined there was no resistance between the main power line and the distributor housing body so inside of the distributor somewhere, there must have been a break in the power wire touching the body of the unit blowing these fuses. Unfortunately due to the design this was something that was unrepairable so unit replacement was the only option.

I got a new distributor in the car and decided to have a look at the carb assemblies as part of the get it running process. The carbs were spraying fuel pretty inconsistently and not through all of the ports. Also the vacuum system and fuel lines needed some love. It was time to do some cleaning! I built some new fuel lines but unfortunately budget limited us here from going any further at this time so it was decided this would be close enough for now!


I cut a service hole for the fuse panel in the seat box, and final mounted all of the vehicle switches to the box and through the floor. Some finishing touches and she was finally ready to go home!

Here are the side by sides, and the final result! Check out the transformation!


I was happy with how everything turned out and had a blast putting this little thing together! Wish I could have gotten' this thing really running and took it for a spin! If anyone needs there hotrod wired/worked hit my line! San Antonio local! I'd love to do another one of these!
Cheers everyone and Happy Creating!
-The WireDaddy- Nate :)


Comments